tea! tea! tea!
I'm not a coffee person (love the smell- don't love the taste). Tea, however, is a hot beverage I can really get behind.
This passion for tea translates into a tea box that just can't accomodate my collection and a tea drawer that is jumbled at best (since there's no room for all of the boxes that the tea comes in, most of the tea bags have been relocated to bags... it's an adventure). This situation is totally fine for me; I usually know what I'm looking for and can just paw through to find it. It's not great for hostessing, though, as guests don't know what's available (why the heck not, right?) and I don't really love the idea of putting 15 ziploc bags full of various tea varieties on my counter every time people come over.
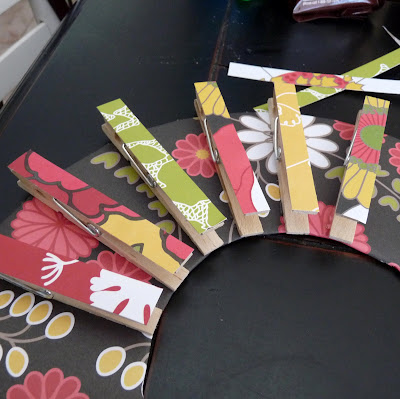
Enter my newly crafted Tea Wreath. With this little circle of goodness, my guests can easily see each kind of tea I have without having to sift through my massive, and sort of confusing, collection. Then, when people leave, I just replenish the wreath. It's both easy for me and great for all the tea drinkers that frequent our house.
To make a Tea Wreath, you'll need:
-two pieces of 12x12ish cardboard (I used the back covers to two scrapbook paper packs)
-patterned paper that compliments your kitchen decor (I ended up using one whole piece and part of five pieces... if you minimized your palette, you could probably do the whole project with two pieces of paper)
-clothes pins (I used 24)
-hot glue
-ribbon for hanging
-sour patch kids (apparently, because they made their way into all sorts of pictures along the way...)
1. Hot glue your two pieces of cardboard together (this is to give your base a little bulk since it'll be holding a bunch of clothespins eventually). Cut the doubled up cardboard into a generally wreath-like shape (a circle, or if you're adventurous, a square). Make sure the 'wreath' part is about as thick as a clothespin. I traced plates to make my circles (you can see that I didn't like my first choice of inner circle and found something smaller to trace instead).
2. Cover your circle with patterned paper. I traced my 'wreath' onto the back side of the patterned paper and then cut outside of my lines by about half an inch to give myself gluing margin. I then notched the margin up to my tracing lines and glued the little tabs around the outside and inside circles. I'm sure there are other ways to cover a cardboard circle- that's just what I did.
3. Cover your clothespins with patterned paper as well. I just cut long strips of paper about the width of the clothespin, hot glued the long strip on, and trimmed the ends.
4. Start hot gluing your clothespins to your wreath. Continue until the whole wreath is covered in evenly spaced clothespins. Make sure that the 'mouth' of the clothespin faces the outside of the wreath (otherwise you'll have a whole jumble of tea bags in the center of the wreath and people won't be able to see which kinds you have).
5. Tie a ribbon on your wreath for hanging. Clip tea onto each of your clothespins. Hang and enjoy!
Không có nhận xét nào:
Đăng nhận xét